Poly gel is technically called Hybrid Gel. Poly Gel, Powder Gel or Acrylic Gel is just a brand name. It's as stiff as Acrylic and only cures once you put it under the UV lamp, Giving you ample time to shape it as you would like it. Making this product perfect for beginner nail technicians and easy to use for the general person.
How to apply Poly Gel
1. Prep your nail. Wash your hands. Make sure you buff the surface of your nail and its no longer smooth. Note: DO NOT file your own nail to much on top. Just enough to roughen up the surface.
2. Apply primer bonder, Wait 30sec and apply 2nd coat. Wait till about 1min. Note: Some products stay tacky and some don’t, both are fine. No need to cure it, Its not a UV product. It will dry by itself.
3. Apply a thin layer of base coat and cure under UV lamp for 60sec. Note: This will stay tacky. DO NOT wipe it.
4. Apply poly gel. Cure 60sec at a time. Note: If you use colours like white or darker colours this might take longer to cure as the UV rays needs to penetrate. QBD poly gel can take up to 2min to cure with a 36w or higher. The lower your UV watt lamp is, the longer it will take to cure. This counts for any UV product.
Optional: 5. Apply colour UV gel polish, a thin layer at a time and cure for 60sec-90sec. Note: Depending how dark the colour is. The darker the colour the more thin you will need to apply it for it to cure better. You don't need to apply colour. You can skip this step.
6. Apply Top coat and cure for 60sec.
Tips: 1. Prepping your nails is very important. Please see the video for this. This will help so your nails do not lift or fall off that easily. 2. Make sure the gel does not touch the cuticle. When you apply any product, always clean around the cuticle with a toothpick or something before you cure it under the UV lamp, It's hard to correct it after it's cured.
Below is a few videos to help you.
Suzie demonstrates the difference between Hybrid Gel and Builder Gel, including the application technique.
Suzie finally has some PolyGel to play with! Using the Gelish PolyGel Master Kit, Suzie tries PolyGel for her first time, exploring how this product compares to using Acrylic or Gel - she even tests a French Design.
Suzie has been wearing PolyGel for three weeks, and she needs a fill. How did the PolyGel hold up? In this thorough step-by step tutorial, Suzie shows how to remove PolyGel, Fill and Sculpt a French Fade with PolyGel.
Suzie demonstrates the differences between building Acrylic Nails with Dual Forms versus Hand Sculpting, in this detailed step by step tutorial.
Suzie shows how to create a beautiful set of Gel Nail Enhancements in this detailed, step by step tutorial. She also completes the look with gorgeous Nude Gel Paints.
50 Best & Easiest POLYGEL Designs & Ideas! (PolyGel Nail Art) best nail art polygel and building gel ideas you should try out yourself!
Apply and remove - A Quick video
What is an Apex? Welcome to our new series, 'Anatomy of a Nail'✨ We are so excited to share the ins and outs of everything you need to know NAIL!💕 Watch and learn about the Apex of the Nail and why it is important. Stay tuned for more!📚
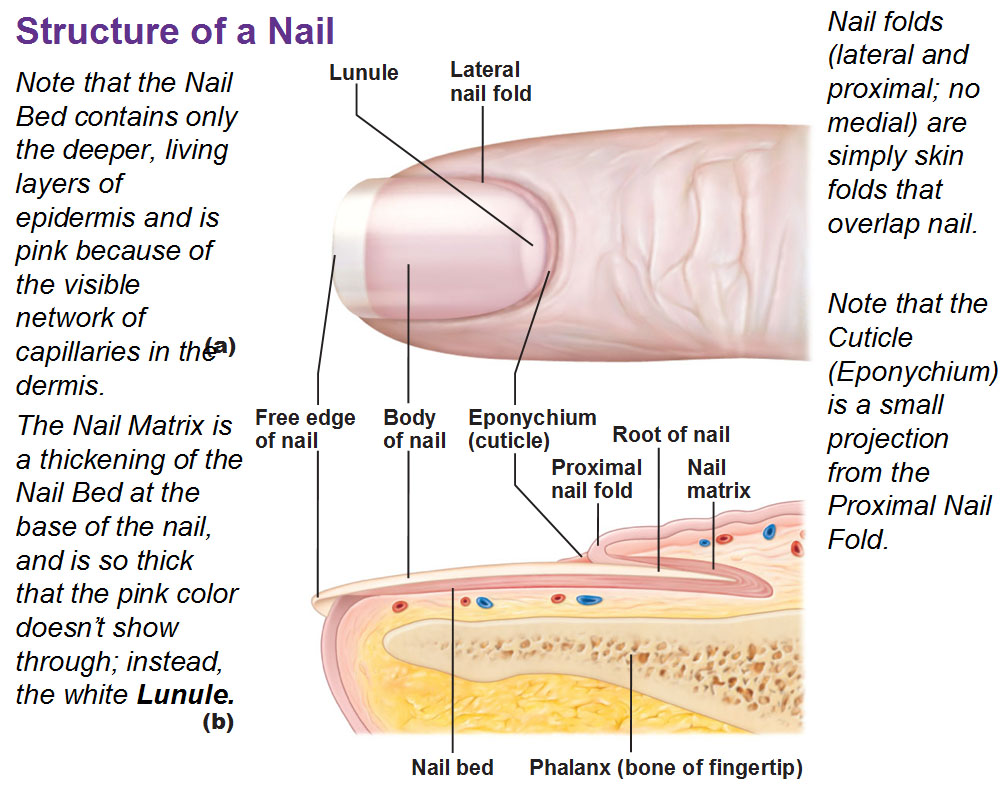
NAIL STRUCTURE
Having a good understanding of how the nail is structured will make it easier for you to follow our nail tutorials.
NAIL STRUCTURE
The Free Edge
The end of the nail plate that is shaped during Manicure & Pedicure
The Nail Plate
This is the visible part of the nail that sits on top of the nail bed. It is made by Keratinisation; the transformation of living cells to hard, dead cells, and it consists of carbon, hydrogen, oxygen, sulfur and nitrogen.
The Lunula
The half moon shaped point where the matrix and nail bed meet.
The Cuticle
The overlapping skin surrounding the nail. Its job is to protect the matrix from being invaded by bacteria and physical damage.
The Mantle
The skin covering the matrix and the base of the nail plate.
The Hyponichium
This skin line where the nail plate separates from the nail bed.
The Nail Grooves
These are the grooves on the skin at the sides of the free edge, and the nail follows them as a guideline when it grows.
The Nail Walls
The skin on both sides of the nail plate.
The Nail Bed
This is the part of the finger underneath the nail plate.
The Matrix
This is where the nail is made. It is the only living part of the nail, and contains nerves and blood vessels so that cell reproduction can occur.